
FMP SCI-FI Character Part 1: Character Development
- SamanthaRichardson

- May 9, 2020
- 6 min read
Updated: Oct 1, 2020
Context
For this part of the project for my FMP I have been working with an additional person to develop this character, the idea was to get someone else to create a backstory for a character and using that I would develop a range of design to and come up with some ideas alongside the chosen person to make the final character. With the person I’m working with, they want to have a character that would feature in a science fiction horror game where mining is its main theme, below is the process I went through to get to what I have created at the end.
Disclaimer
All rights to this character belong to Daniel Spink and should not be repurposed, copied or shared on ant other site without his express permission.
Character moodboard
To get started on the characters sketch we both discussed the plan of how she will look and have chosen this set of images to be the main inspiration for her character development. With these images each represent a part of who she will be such as the bright blues and purples for her eyes and hair and the metallic rough clothing for her uniform.
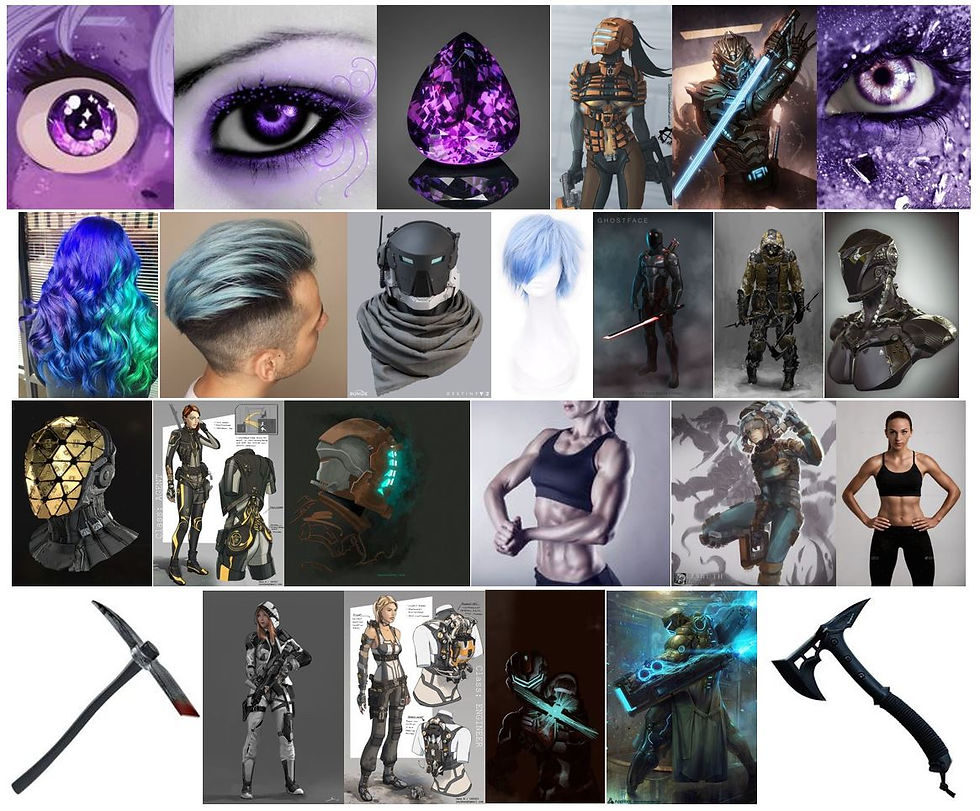
With these images I plan on creating the character differently by trying to avoid all uses of black outlines as possible so that she can look fairly natural without following heavily into a cartoon style, as the character will be in a dusty place I will be making sure to try and add a lot of texture to match her mining based environment.

I wanted to get the proportions correct and to make it look as realistic as possible. Using Pintrest, I found a range of images for headshots that I liked an using this and adjusting the features with the blur tool, I was able to move each section little by little until I found the right face shape and feature set for me.

As the person I’m working with wants the character to have wavy hair that curls in and out, I needed to make sure I did this correctly by using line drawing as a way to express direction of each strand of hair. This gives the illusion of a 3D like effect of hair weaving in and out.


Using Clara.io and Maximo I took two 3D models, one with a rig to use as a reference for a pose I was looking for. As of this time, people weren’t available who had the body build I was looking for. I thought it would be suitable to use a 3D model in their place as a reference due to the internet not having the resources I wanted.

Using Maya, I imported the 3D models and positioned them to how I wanted the character to stand. The important factor here was positioning the head to match the one I had chosen to use for the character. This made it a lot easier to see the correct proportions and anatomy needed for a female human. By having the axe as an additional prop, this will help to be a placeholder for a similar item that will be used in its place. Thanks to the uses of photoshop, if I don’t like how the body is, I can easily adjust it using a range of various tools.
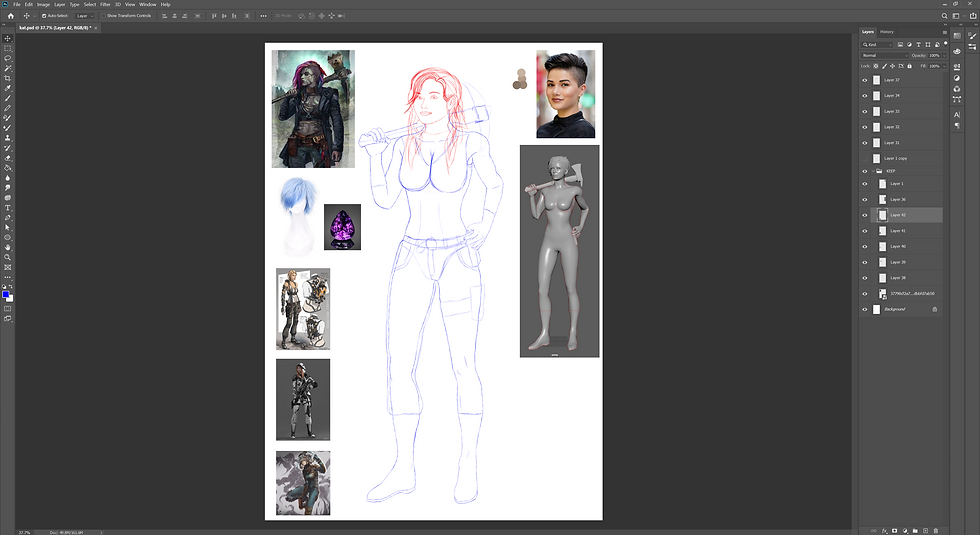
Using the references and models I gathered, I have created the basic outline of how the character will look by drawing a hard copy over the top. Using this sketch, I have shown my partner what ideas I have so far to see if they’re satisfied with the current character idea.
Feedback from Partner:
“I like her outline and general figure as it definitely makes her look like she’s in a physically demanding job. She looks cute, but still looks like she has a strong personality about her which is something I mentioned to include. So far it looks good, I can’t wait to see her when she has some colour an such introduced.”
Happy with the feedback, I will continue to work on the character and from this point on I will be making sure to keep in close contact with them so that I can make sure I adding the right colours, images, and features onto the character design.

Using the headshot I like the most, I used this as a reference to capture the lighting and colour tones for the characters face, keeping the detail accurate and true to its form.


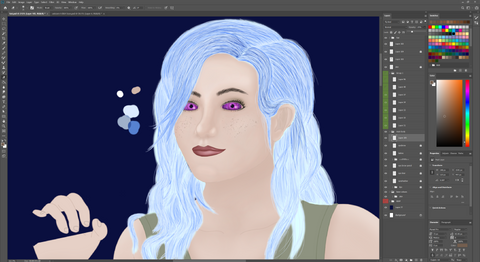
By using various hair sources and the hair colour that was provided for me to use, I carried out the sketch work of the hair using the multiply brush to darken the strands each time I went over them. With each curl and bend, I made sure the directions of the lines followed in its path to represent the different directions the hair was curling in. This works similar to how I created my fantasy character; except I will be keeping all loose strands of hair as I’m focussing on a more realistic look. However, there will be some control using harder lines to define certain details.

Here in this image, I had completed the face work and the majority of the shading. So far, I’m very pleased with how it’s turning out with the pose that has been chosen. It gives her a sense of power and with the added dust and dirt covering her body shows that she’s a hard worker an that she’s reliable at her job. This is one of the important features that my partner specified.

While creating this character, I was having fun creating a strong female type until I was specified until this one feature. I was taken aback to the description of what was on her vest shirt and found it funny that the character has both a serious and a playful side. I took this a step further after reading the shirts description of having a unicorn breathing fire, to instead what I felt amusing, of a unicorn barfing fire. As this is going to be a graphic vest shirt she wears commonly, I felt it would be fitting to have the graphic design on the shirt to be fairly worn out. Within my arsenal of brushes, I had the perfect one for this that created a rough textured surface that layers the colour, darkening it with each stroke while leaving a fair amount of gaps to show the vest peeking through, creating the image of wear and tear from an old shirt in real life.

As the project is coming into a close, I needed to keep the character fairly simple so that the features were manageable enough to get as much detail in as possible. In the future I will be looking to continue the design of this character as I have promised that I will help them develop the character concept for their game.
Current thought of my partner
“I really like the eyes; it was a core feature of her an I feel like her eyes are exactly as I had imagined. The durpy unicorn sells her mixed personality in what would be a drab environment. She looks as though she spends all day in the mines which is a perfect combination with the lack of makeup as she wouldn’t waste time everyday trying to pretty herself up, just to go hit some rocks. I love the colours of her outfit as it suits the aesthetic of a miner. Probably the only thing I’d change is the axe, making it brighter and potentially a more solid blue. The H.E.D (Hazardous Environment Detector) is about the right size for what I had in mind too, as it was supposed to be something small and agile that isn’t heavy enough to inconvenience the user.”
From this feedback, I’m glad to know I did the character justice. However, the next step for this character will be to look into improving the current outfit as well as developing her more cybernetic uniform that she wears when doing more dangerous jobs. With this, it will allow me to focus on more geometric shapes as well as featuring more circuitry-based imagery that is seen commonly within science fiction based content. Just like within the development of the fantasy character, I’ll also be looking into improving and drawing her items separately, placing them alongside the character to show off the collection, making her whole.


Comments