


Cosmo Character Creation: 3D Development
- Samantha Richardson
- Apr 8, 2020
- 8 min read
Updated: May 4, 2020
To create the 3D model of our character I will be using Maya, As the character is going to be fairly small on a mobile phone I will be aiming towards a low poly count and simple details however, as the base mesh can be used for animations and other products I will be creating the core details with the smaller parts that will be added as height maps on substance painter.
we have also decided that we will be giving the players an option to use the character in one of two genders creating a choice for the player when they interact with the game so from the 2D development of the character I will be using the blacked out variant of the characters face to hide their main features.

To work on the character, I will be using the character image with the face showing so that I can see how it compares to the main helmet, for example with the chin part if I make any changes to its look I may cover the mouth of the character or the lights being too close together. For what is drawn on the character may not be the same compared to how its is seen on the character due to its perspective.
To save time and make sure that the model is accurate to the image I set the mirror to world X so that when I work on one side it will be the same on the other.

Using a sphere for the base of the head I made sure to line the outside of it with the helmet on the image so that I can work on how the overall scale will look.

Using the quad draw tool, I traced the base shape of the neck collar of the suit so that I can shape the head to match and fit well with the body. Using a cylinder, I had also created the base collar in which the neck collar will be surrounded by.


To make sure that the shape of the collar stayed where I wanted it I had extruded it, rotated it and lined it up with the collar so that it blended in and matched nicely.


Once I was happy with it I froze its transformations and reset it so that the pivot went to the centre of the model, I had the duplicated the shape by changing scale Z to -1 so that it mirrored the object onto the other side. To link the objects together I had combined the two objects then I had merged the vertices together.

Using the sculpting tools in Maya I had created the face plate shape that I wanted then, using the freeze tool I locked all of the parts I didn’t want to move so that I could work on the back of the character. Using the tools settings box and graphics tablet it had allowed me to apply the right pressure I wanted to create the shaped I needed.


To make sure the head matches the body I had lowered the collar like it would be on the front of the body and then I had it locked so that I could see it while it wouldn’t be interrupted as I worked on the heads shape. As you can see from the image I was able to balance out the shape so that it looked some what natural to the style we are going for with the character.

After getting what I wanted with the head I started to work on the body by first creating the arms. For this I got one cylinder placed it at the angle I wanted and the froze, reset and flipped a duplicated object, as they both matched the same position on the opposite side they still worked the same way with the world set to X making what I did on one side apply to the other.

Once I shaped the arms to how I wanted them I had extruded the base of the sleeve to match the hand control panel and where the gloves would attach onto the suit. Again, using a cylinder, I had shaped it very roughly around the body and the top of the legs to capture the shape of our character.

Using the sculpting tools, I started to work on the body shape more giving it more definition to the characters shape while adding more polygons to keep it smooth. As we are making this version genderless, I had worked on more of a less curvy figure so that it could potentially come across as ether the player sees fit.

Once I was done with the base assets I showed all the parts to get a good look of how I’m doing and after a brief evaluation of what I created I liked where it was going but there needs to be more work done on the body making it look rounder and the head needs some readjustment as I feel like its not sitting right. I do however like the shape of the face plate so I will be working more on that.


As I’m happy with the face plate I have decided to topologies the front of it properly so that the characters head can be extruded and shaped properly to the design of the original helmet.

To get the curve I wanted for the front place I made sure to set the shape ad a live object so that the surface stuck to its form. As I didn’t like the shape I has I had decided to work from scratch by readjusting the helmet to how I want it to be without the shape I had restricting my creative imagination.

Once I was happy working on the new topology for the head I had extruded the face plate inwards just like how I have done in the image for where the glass would be placed.

Once I was clear with what buts I didn’t want to move I used a very fine brush to focus on single vertices to outline what I wanted and a bigger brush to highlight the rest.


To make sure that what I had done matches well I relaxed and smoothed the mesh while also sculpting out any sections of the helmet that felt off and once I was done I asked the team leads of their thoughts and they through that this was a better improvement to the las one as it is a lot more rounded better fitting the character style.

If the 3D model of the character is smoothed I have added some off set edge loops to keep the sharp edges of the character.

To create the added details and parts of the character I used quad draw to create the basic shaped I need to map out how they would look and see if any needed resizing and their position adjusted.


For some parts of the helmet I made on one side as when I tried to move them in or out of the character the world positioning of mirror changed the scale of the item, so once I was finished I duplicated them on the other side.

For the top part of the helmet and the chin the shape the detailed parts needed to be changed as they looked off on the character image compared to the model, this was an easy thing to fix as the base shape was easy to work around with separate objects.

As only the front of the character was drawn for the concept it gave a lot of creative freedom of what could be done to decorate the back, for this some parts of the helmet I had continued to follow around the back.

To hide the section that didn’t quite transition well onto the design I created some ridges to look like piping on the helmet which fit nicely as a small addition.

I then decided to add a box which could be used to hide any other sections of the design like in the previous image, as a lot of space technology had a lot of electrical compartments , by adding a box it worked well to create the affect of making a compartment for any switches and circuitry.


For the top details I decided to add a ridge that fed into the helmet to act almost live vents to let out any unwanted air from the suit.

For the head lights I had also continued the piping to the control panel to connect with the theme and function of the design.

I also extruded the middle section to be used as ether a windowed panel or a small door to access the circuitry. (Depending on how it does with texturing)


After getting the feedback from the overall look of the character we felt like they seemed too tall so by using the soft select I adjusted the height then moved everything into position.

Once I was happy with the creation of the helmet I then started to complete work on body by joining the arms and extruding the feet from the body as a whole. To keep the poly count reduced the additional fiddley parts of the suit will be done on substance painter as a height map.


As an added bonus feature to the design I have created a fairly simple back pack for the character that can be used to power the suit, keep oxygen, help with movement and a radio.

As the game is going to be using simple functions for animation and the character is going to be fairly small on the screen the lead of programming suggested that I change how I created the hands by using a more mitten like design instead of fingers.


To create the hands I extruded the shape that was traced, joined them and sculpted them into shape with and outer curve to resemble the back of the hand and an inner curve to represent the palm. From the suggestion I like to thing this was a much nicer change for the design and it suited well for an audience towards children and fitted perfectly with a cartoon art style.


To mark the centre part of the characters body I added the little detail from the drawing so that it assisted the artist with the design and I though would be interesting to uses as a body tracker for the character. This is the final result of the character giving a front and back view.

For the next stage of creating the character is the clean up and textures, for this I cleared all the history on the file and went through grouping and naming all the parts as well as giving everything its own texture and making sure that is named too. This is very important as it makes it easier to find parts and identify the mesh maps when they are put into substance painter.


Once everything is clear the mesh needs to be unwrapped and cleared so that it can be textured easily on identifiable sections.

To make the process a lot easier I had used Mixamo to add a simple rig to the character and apply the animation. As the character is going to be on a small screen with simple tasks the requested animations were idle and running.

When the team programmer tested the mesh on Unity he had noticed that the bottom legs didn’t match the top.

He had pointed out that I needed to make sure that Soften edge was selected in maya as the poly count was different in some areas due to the poly count which I hadn’t noticed before I exported it.

He had sent me the new file back and I reworked the rig on Mixamo and from what I can see looked a lot better after I noticed the mistake.


For the first run of the character I had exported the animations without the skin as you can apply this to one set in unity without having too many issues.

For some reason the file didn’t register properly on unity so I had then re sent the file with the skin for the programmer to use instead.

This is the final result showing how the character will fit on the game.

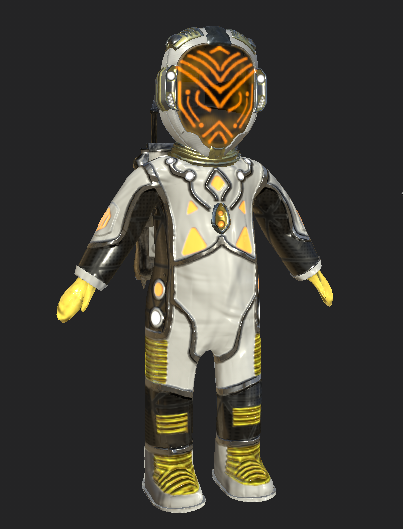

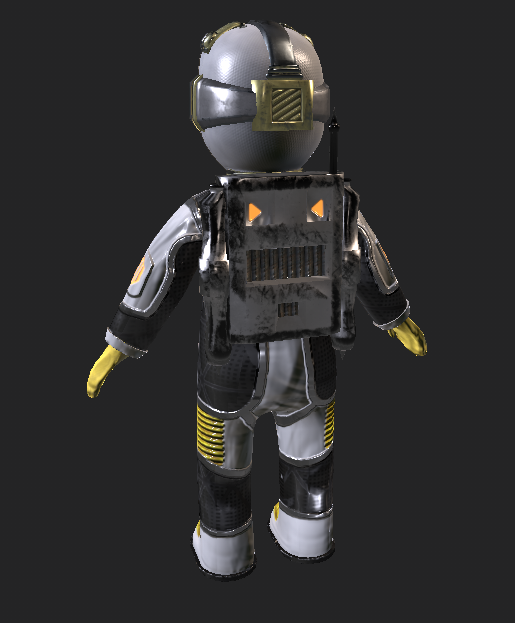
Once everything was ready, I had offered to our creative group the chance to work on the texturing as they had already settled on a theme and style of how they were going to work on the textures. Out of the group Liam Miller had decided to take on the role so I gave him a set of constructions and the concept work as a reference and this was the final results. I am glad to say that I’m happy with what I have seen and I feel like I made a good choice to tell them to do what they with the new added features that weren’t included on the original set.


Comments